Jul 11, 2023

Author(s)


Amazon Web Services (AWS) Elastic Kubernetes Service (EKS) and Neural Magic's DeepSparse work together seamlessly to provide customers with impactful deep learning inference for production environments. This paired solution offers an accessible and efficient alternative to default hardware choices often used in large-scale machine learning deployments. Advantages of integrating of these two technologies include improved scalability, reduced infrastructure costs, and expedited model deployment.
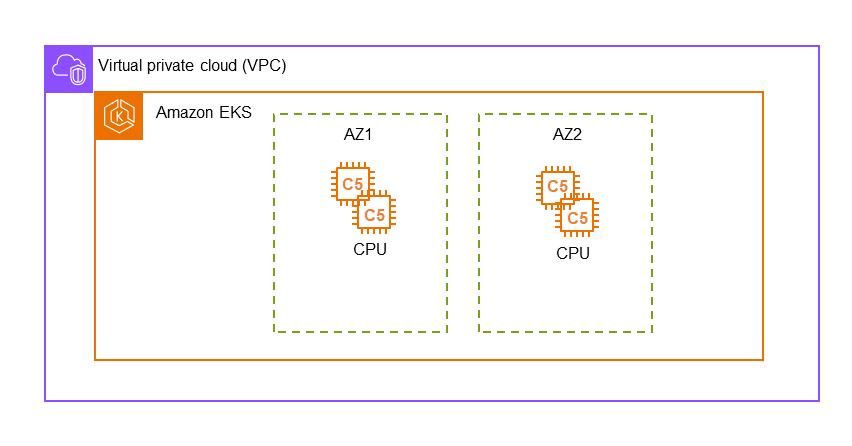
In this blog, we demonstrate how to deploy the DeepSparse Server on AWS EKS for real-time inference, using a sparse BERT from Neural Magic's SparseZoo. Follow along to learn how to easily deploy the DeepSparse Server to support machine learning models on an Amazon EKS cluster, that leverages cost-effective CPUs. You will create your own virtual private cloud (VPC) to deploy EKS clusters running on C5 instances CPUs across two area zones.
Deployment requires the following tools and libraries:
- AWS CLI version 2.X that is configured
- Docker and the Docker CLI
Getting Started
Before you stage your EKS cluster in AWS, you need to clone this demo’s Git repository.
git clone https://github.com/neuralmagic/aws-do-eks.git
cd neuralmagic/aws-eks
This directory is a fork from AWS-do-EKS which holds all of the bash scripts required to stage your EKS cluster. We also added a directory to serve a Docker container with the DeepSparse Server found in the aws-do-inference directory. After staging, you will pass this container to be run inside a pod in the cluster.
Staging your EKS Cluster
To create and manage EKS clusters using a custom image with all essential tools and scripts, execute the following bash scripts:
- Run the ./build.sh script to build the image.
- After the image is ready, run the ./run.sh script to initiate the container locally. This container holds all of the necessary scripts and files found in the Container-Root directory.
- Next, run the ./exec.sh script to launch a bash shell within the container.
- Finally, run the ./eks-create.sh script to deploy the EKS Cluster on AWS.
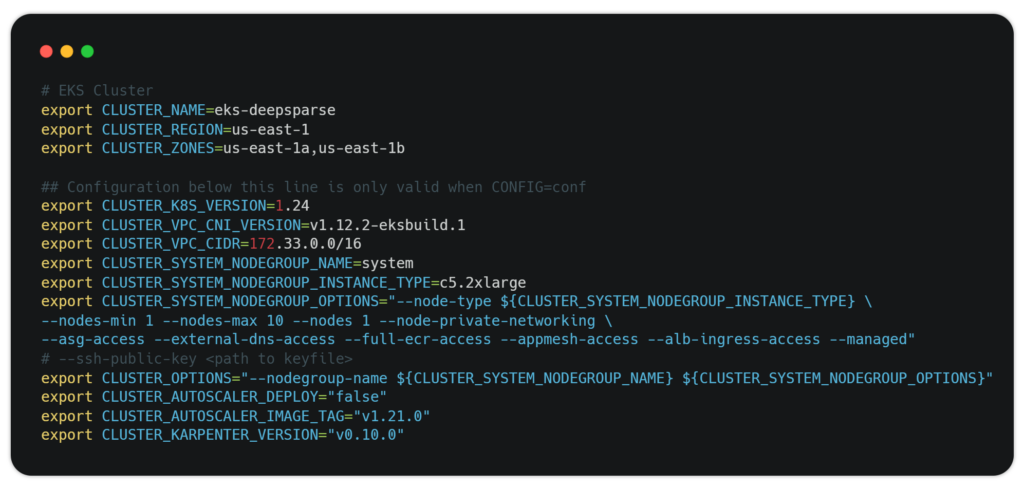
The eks.conf file in the aws-do-eks/tree/main/wd/conf directory contains all EKS-specific configuration items (such as cluster name, region and cluster zones). You can use these items to run the action scripts to create, scale, or delete your EKS cluster. Here are the current default configurations:
Note: Setting up your EKS cluster can take about 40 minutes to complete.
Adding the DeepSparse Server to Your Cluster
Once your EKS cluster is set up:
- cd into the aws-do-inference directory in a separate terminal shell.
- Add your AWS account ID to the aws_account_id variable in the config.properties file.
You can edit the conf.properties file to further configure the inference deployment (such as region, image names, namespace, type of instance to use).
Customizing the DeepSparse Server
To configure the DeepSparse model and task settings, modify the server-config.yaml file:
endpoints:
    - task: question_answering
      model: zoo:nlp/question_answering/bert-base/pytorch/huggingface/squad/pruned95_obs_quant-none
      route: /invocations
      batch_size: 1
      kwargs:
        sequence_length: 128
The server.config.yaml file is the standard method to configure the DeepSparse Server across any deployment. For more information, check out the DeepSparse Server User Guide on GitHub.
Pushing the Docker Image
You need to build a base image tailored to your processor of choice. For our example we’ll use a CPU image since we want to use c5.2xlarge instances (8 vCPUs, 16.0 GiB) in our cluster.
1. Now build the image:
bash ./build.sh2. Log in to a private registry on AWS by running:
bash ./login.sh3. On AWS ECR, create a new repository called base-cpu, and then push the image to ECR:
bash ./build.sh push4. Build another image that incorporates the DeepSparse Server by using the previous CPU base image. Execute the following script:
bash ./pack.sh5. Push the image to ECR:
bash ./pack.sh pushAutoscaling Your Cluster
Before you deploy the DeepSparse Server in your EKS cluster, you can modify the autoscaling group down to a minimum number of c5.2xlarge instances that you require for your deployment.
- In the EC2 console on AWS, click the Auto Scaling Groups menu option.
- Select the eks-c5-2xlarge node and click the edit button.
- Adjust the desired capacity of nodes to form your cluster.
In addition to setting your minimum and maximum nodes, you can set a Dynamic Resource Scaling policy for CPU utilization to manage inference workloads. The scaling policy will be triggered if the average CPU utilization across the pods in the system reaches or exceeds a specified threshold. Here is a video on how to create a CPU utilization policy at 75% on the AWS console:
https://drive.google.com/file/d/1-QUPtE2GgRKVAaVZGVLtvmEzPMGMO1Wo/view?usp=drive_link
Deploying the Image
You are now set to push the DeepSparse image into a container in the cluster.
1. Use this script to deploy:
bash ./deploy.sh2. Use the following command in the open bash shell of your EKS Cluster to view all running pods in the cluster and confirm your pod is up and running:
kubectl --namespace kube-system get pods3. To interact with a single node hosting the DeepSparse Server from your local machine, you can establish a port forward in a separate terminal:
kubectl port-forward svc/pruned95-obs-quantized-cpu-0 8080:8080 -n kube-system4. To test the deployment, call a prediction from DeepSparse for question answering using this cURL command:
curl -X 'POST' \
  'http://localhost:8080/invocations' \
  -H 'accept: application/json' \
  -H 'Content-Type: application/json' \
  -d '{"question": "What does Snorlax love?",
  "context": "Snorlax loves my Tesla"
}'
You should receive an instantaneous prediction from DeepSparse:
{"score":18.0887451171875,"answer":"my Tesla","start":14,"end":22}
PRO-TIP: Since the DeepSparse Server runs on FastAPI, you can use the FastAPI Swagger UI to test the server in your local environment. Paste the following URL in your browser:
http://localhost:8080/docsTo delete the server deployment run:
bash ./deploy.sh stopBenchmarking DeepSparse
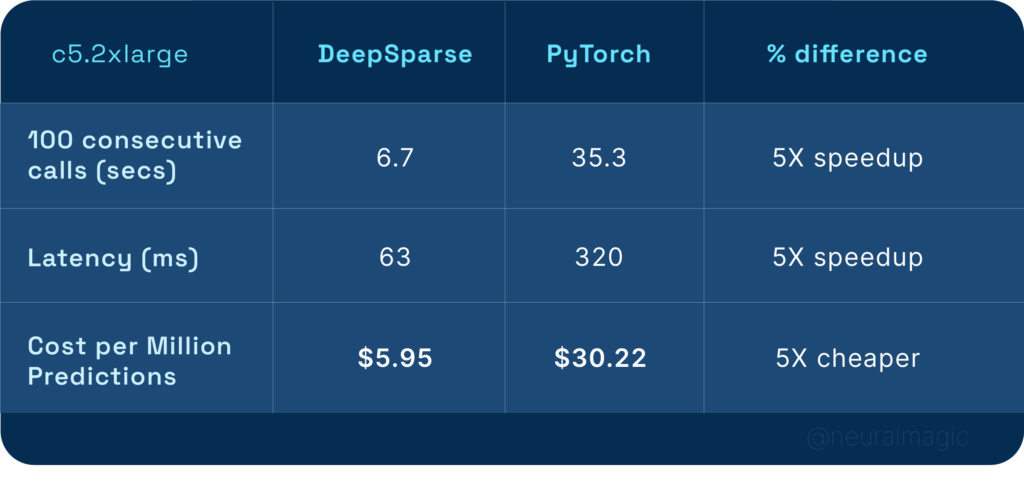
To demonstrate how well DeepSparse performs on commodity CPUs, let’s benchmark it against PyTorch on a c5.2xlarge node with a $0.34 on-demand hourly rate. With a batch size of 1 and sequence length of 128, DeepSparse achieves 5X performance when compared to PyTorch for the question answering task.
DeepSparse does not require PyTorch, which means a smaller sized deployment. As such, users can load more models per server in their deployment and scale more efficiently.
Final Thoughts
We outlined a seamless method for you to deploy a sparse transformer model for sentiment analysis on AWS EKS using the AWS-do-EKS format. This approach automates the creation of an EKS Cluster, and the deployment of the DeepSparse Server. We also benchmarked the deployment flexibility with autoscaling and highlighted results with the sparse BERT model for question answering against a dense BERT running on PyTorch. Results included a 5X speedup in performance while being 5X less costly to deploy, which at scale, can be significant for organizations using EKS for deep learning.
For more on Neural Magic’s open-source codebase, view the GitHub repositories, DeepSparse and SparseML. For Neural Magic Support, sign up or log in to get help with your questions in our community Slack. Bugs, feature requests, or additional questions can also be posted to our GitHub Issue Queue.