May 10, 2023

Author(s)


As organizations continue to explore and invest in AI to advance their productivity and bottom lines, it's become clear that deploying models can put quite a dent in IT budgets. Organizations want the option to use cost-efficient commodity CPUs to support AI development. One option for companies to consider is DigitalOcean's Premium CPU-Optimized Droplets, launched in February 2023, which are virtual machines designed for high throughput and dependable performance. Droplets are best suited for network and compute-intensive tasks like streaming media, online gaming, data analytics, and artificial intelligence. This new offering positions DigitalOcean as a great platform option for startups and SMBs who want to deploy high-quality inference runtimes like Neural Magic’s DeepSparse, which takes advantage of CPUs to deliver best-in-class AI performance without sacrificing accuracy.
In this blog post, we cover how to deploy a Gradio UI that benchmarks the performance of optimized Neural Magic SparseZoo models on the new Premium CPUs of a DigitalOcean Droplet and compare it against their regular CPUs. We will walk through how to deploy the demo on a virtual machine, execute the demo, and collect model performance metrics between the two instances. By the end of this post, you will understand how to benchmark the performance of DeepSparse on virtual machines, and how to leverage cloud computing platforms such as DigitalOcean to streamline the process of deep learning deployments, using sparsity to get GPU-class performance from commodity CPUs.
Deploy Neural Magic’s Benchmarking Demo
Before you deploy a DigitalOcean Droplet you need to:
- Have a DigitalOcean account and obtain an API token.
- Select and spin up a DigitalOcean Droplet.
- Configure the Droplet for a Python environment.
- Git clone the DeepSparse repository and install dependencies.
- Host the benchmarking demo via a FastAPI endpoint.
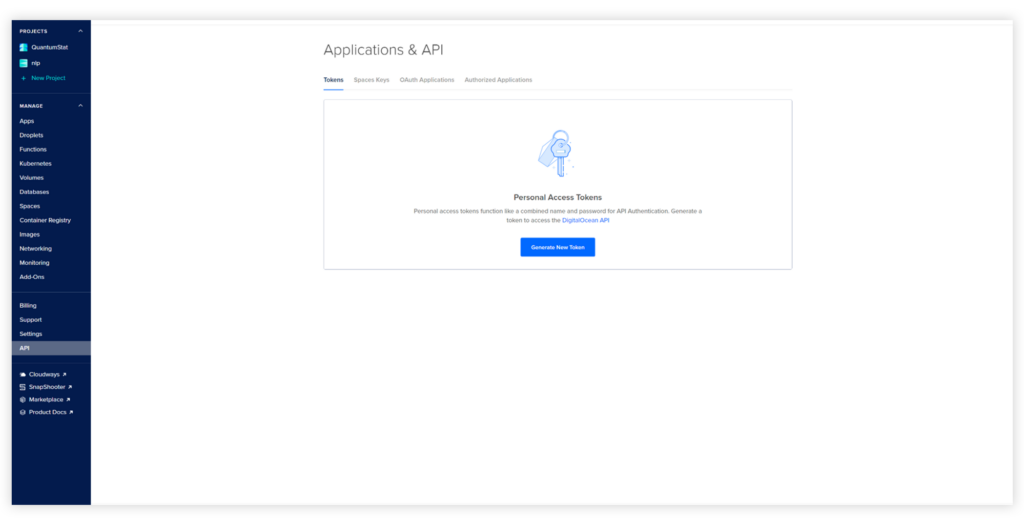
Step 1: Obtain a DigitalOcean API Token
Log in to your DigitalOcean account and click on the “API” button. Press the Generate New Token button and create your token. You will use this token in the next step to interact with the DigitalOcean API for Droplet creation via the python-digitalocean client.
Step 2: Select and Spin up a DigitalOcean Droplet
You can spin up a DigitalOcean Droplet via the console or from a client library. For our example, we use the python-digitalocean library to spin up a compute-optimized Droplet. The library can be installed with:
Unset
pip install -U python-digitalocean
Before you spin up an instance, configure the Droplet class by adding DigitalOcean’s API token created in Step 1. In the code snippet below, the class is configured to spin up a 4CPU 8GB RAM Premium Droplet in the NYC-1 region on Ubuntu with SSH access.
PRO-TIP: For security reasons, we highly recommend using SSH keys to access virtual machines in the cloud. For more information on how to obtain SSH access for DigitalOcean Droplets, follow the instructions here
After the class is configured, run the droplet.create()method to spin up a Droplet.
Python
import digitalocean

manager = digitalocean.Manager(token="<TOKEN>")
keys = manager.get_all_sshkeys()


droplet = digitalocean.Droplet(
token="<TOKEN>",
name=ubuntu-c-4-intel-nyc1-01",
region="nyc1",
image="ubuntu-22-10-x64",
size_slug="c-4-intel",
ssh_keys=keys
backups=False
)

droplet.create()
Step 3: Configure the Droplet for a Python Environment
After your Droplet has booted up, SSH into the Droplet from the terminal with your Droplet’s IPv4 address:
PRO-TIP: To obtain the IPv4 address of your Droplet, you can view your DigitalOcean console and look in the Droplet section. The IP address should be displayed on your Droplet.
Unset
ssh root@<ip-address>
Before you install the appropriate libraries for Python, update your machine. If you encounter package configuration questions during installation, press Enter and keep advancing:
Unset
apt update
Afterwards, install Python and associated libraries:
Unset
apt install python3-pip python3-dev build-essential libssl-dev libffi-dev python3-setuptools -y
Install the python3-venv package, create a virtual environment, and activate it:
Unset
apt install python3-venv -y
python3.10 -m venv env
source env/bin/activate
Step 4: Git Clone DeepSparse and Install Dependencies
Now it’s time to git clone the DeepSparse repo to the instance. Afterwards, cd into the “benchmark-ui” directory and install dependencies:
Unset
git clone https://github.com/neuralmagic/deepsparse.git
cd deepsparse/examples/benchmark-ui
pip install -r requirements.txt
Step 5: Host the Benchmarking Demo via a FastAPI Endpoint
The DeepSparse, Gradio, and FastAPI/Uvicorn packages should now be installed to launch the benchmarking demo. Conveniently, the app.py module is already configured to spin up a FastAPI server on demo start. To launch the demo, run the following Uvicorn command in your Droplet’s terminal:
Unset
uvicorn app:app --host 0.0.0.0
After the Uvicorn server is running, add the IPv4 address of your VM instance to your web browser. By default, Uvicorn runs on port 8000, although this can be edited in the previous Uvicorn command by adding the --port flag and your desired port number:
Unset
http://<ipaddress>:8000/deepsparse/
Optional: Run Gradio Without FastAPI Endpoint
If you prefer to keep things simple and are only interested in launching the demo inside your Droplet for testing purposes, you can use this command instead:
Unset
python app.py
Afterwards, click on Gradio’s public URL link:
Unset
>>> Running on public URL: https://XXXXXXXXXXXXXXX.gradio.live
Step 6: Interact with the Demo
The demo should now be running in your Droplet. It includes various parameters that are discussed in the introductory text of the demo including CPU information such as the number of CPUs, RAM and CPU model name. You have the option to select up to 28 sparse/dense models from various tasks in Computer Vision and NLP. The current model selection available is not exhaustive, and if you prefer to edit the current models' selection, you can edit the zoo stubs found in settings.py module with other models found in the SparseZoo.
Interaction example: https://drive.google.com/file/d/1uWh9NTgERsZVVdSdrHrMWKB6BIpSqHiW/view?usp=share_link
Benchmarking DigitalOcean’s New Premium CPUs vs. Regular CPUs
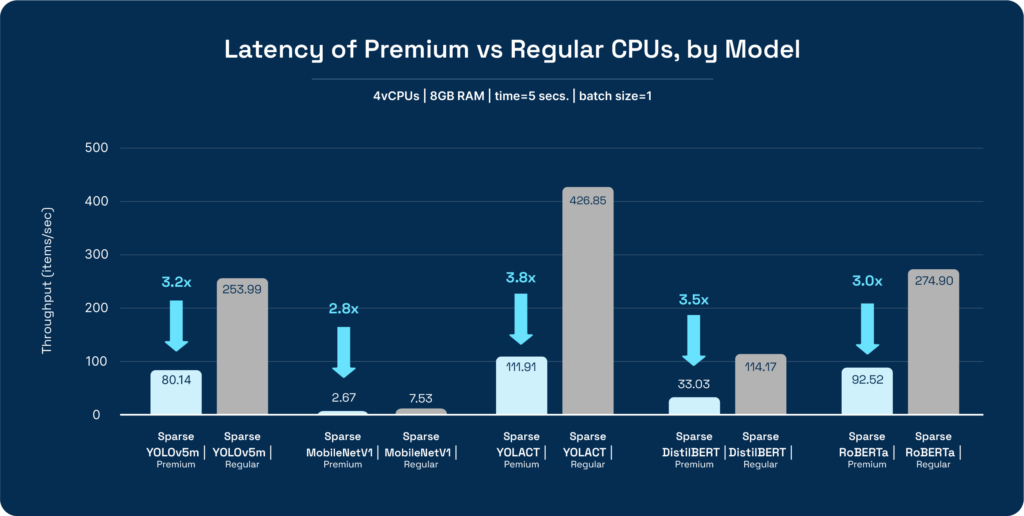
Now that we know how to deploy our benchmarking demo on a DigitalOcean Droplet, we'll compare DigitalOcean’s new Premium CPU instances versus their regular CPU instances when running DeepSparse. We launched the Gradio demo and ran various benchmark configurations for 5 models: Sparse YOLOv5m for object detection, Sparse YOLACT for image segmentation, Sparse MobileNetV1 for image classification, Sparse DistilBERT for question answering and Sparse RoBERTa for the document classification task.
You can view the impressive benchmarking results below, using DeepSparse on only 2 cores for each instance:

For a more granular view into the numbers:
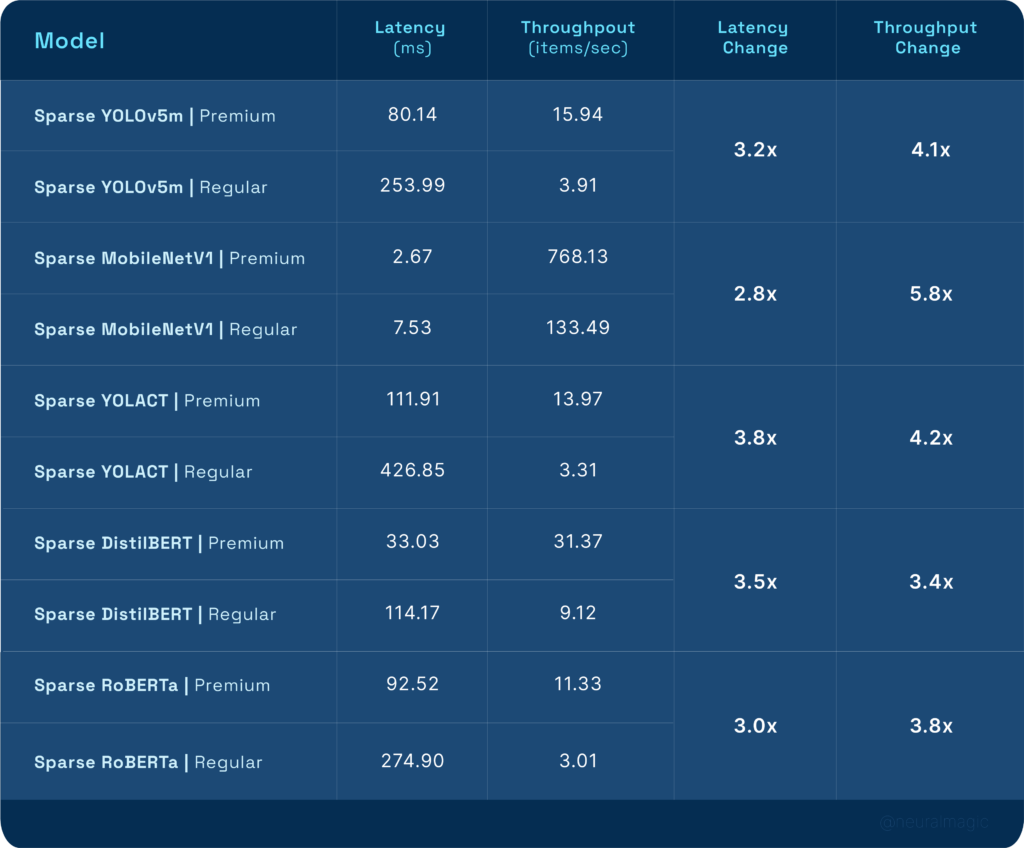
Using DigitalOcean’s Premium CPUs had a significant impact on model performance. Latency improved by a minimum of 2.8X and throughput had a minimum improvement of 3.4X when compared to regular CPUs. An important factor to consider was that the increase in the Premium instance cost was negligible when compared to the regular CPU instance: $0.125 per/ hour vs. $0.162 per/ hour for the regular vs. Premium instances respectively.
Final Thoughts
This blog post provides an in-depth guide on how to deploy a Gradio demo that benchmarks the performance of DeepSparse on the CPUs of a DigitalOcean Droplet. By following the step-by-step instructions provided in this post, you should now have a better understanding of how to package the demo, configure the Droplet, execute the demo, and collect performance metrics.
Additionally, benchmarking was performed on Premium vs. regular CPUs to understand the scaling performance of DeepSparse when running on commodity CPUs of a major cloud provider. This information can be used to make informed decisions about hardware configurations for deep learning workloads.
Finally, for those who are interested in deploying Neural Magic models, we recommend you utilize DeepSparse as a hosted inference solution. Documentation on how to run the DeepSparse server can be found here.
For more on Neural Magic’s open-source codebase, view the GitHub repositories, DeepSparse and SparseML. For Neural Magic Support, sign up or log in to get help with your questions in our community Slack. Bugs, feature requests, or additional questions can also be posted to our GitHub Issue Queue.