
Jun 06, 2023

Author(s)

This is the second entry in our Google Cloud blog series. We recently launched our DeepSparse Inference Runtime on the Google Cloud Marketplace, to make it easy for ML practitioners to deploy their models at the click of a few buttons.
Latency, accuracy, and inference costs are all critical when deploying natural language processing (NLP) and computer vision (CV) models. Unfortunately, the most accurate models are also the largest, which make deploying them complex and expensive. Deploying these models with low latency requires specialized hardware, which can be costly and requires technical expertise. Now, DeepSparse enables you to deloy NLP and CV models on ubiquitous CPU instances on Google Cloud, with top-notch speeds and accuracy.
In the last blog, we walked you through how to set up DeepSparse from the Google Cloud Marketplace. In this blog, you will learn how to deploy NLP and CV models on Google Cloud using DeepSparse Inference Runtime.
Let’s start with natural language processing.
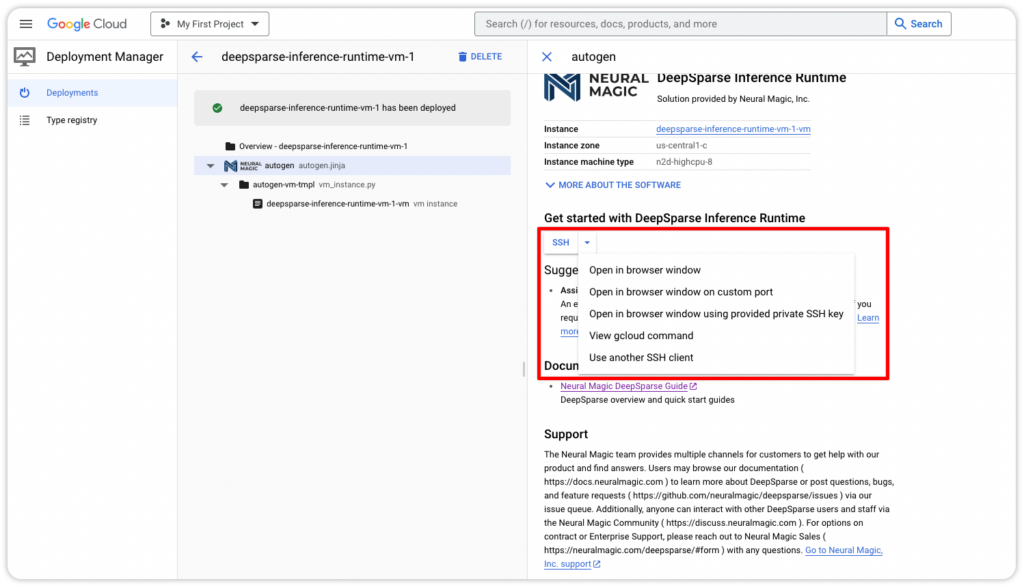
SSH Into Your DeepSparse Google Cloud Instance
Log in to your Google Cloud instance by selecting one SSH option on the deployment page.
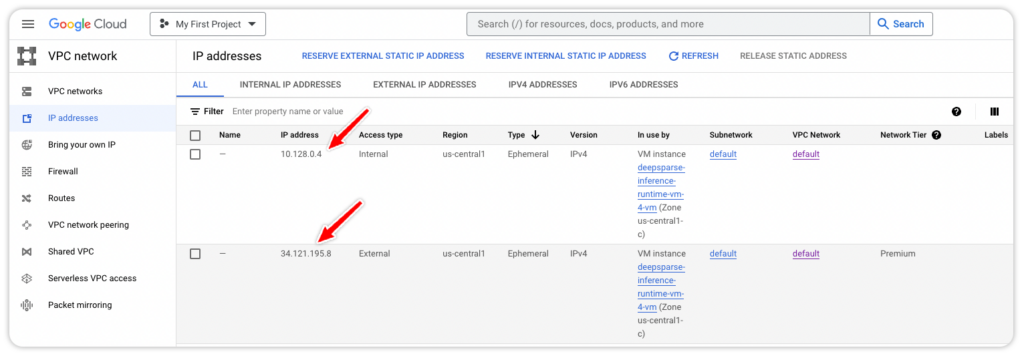
Alternatively, you can check the instance's IP address and log in with the SSH key in your terminal that was set up, if you had followed along in our last blog.
Deploy an NLP Model From SparseZoo Using DeepSparse Pipeline
Now that you are set up with your DeepSparse instance, go to SparseZoo, filter by Sentiment Analysis, and select the quantized BERT base uncased model trained on the SST2 dataset.
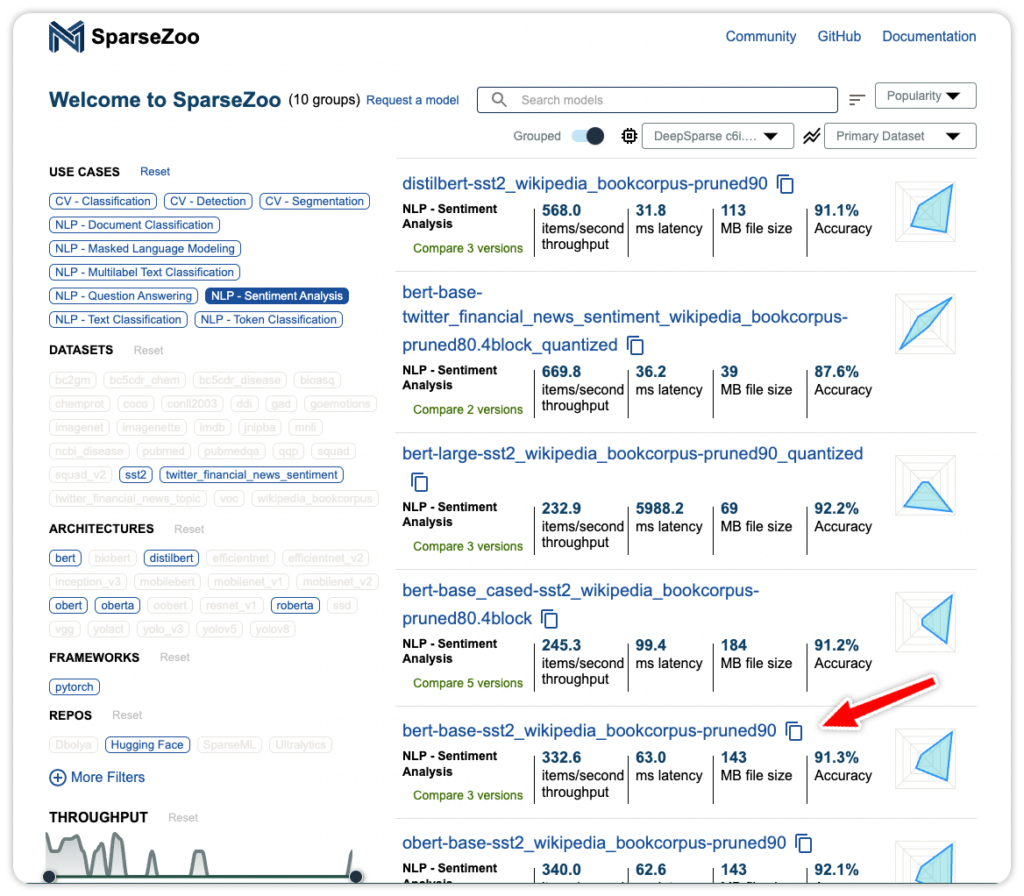
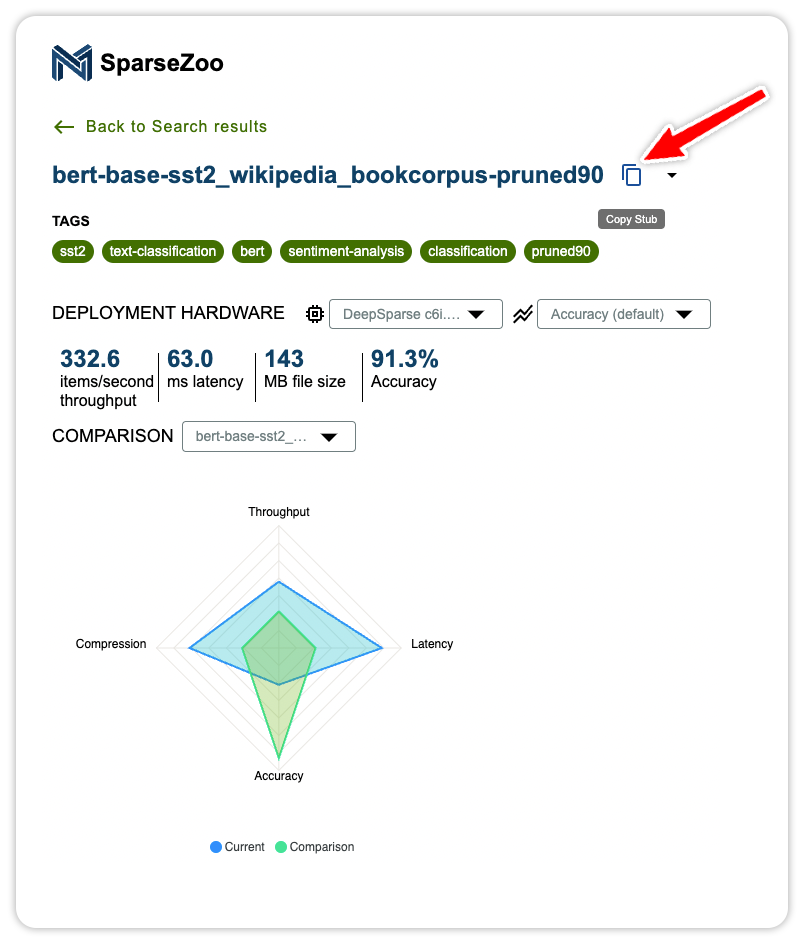
Click the model for more information. Use the Copy Stub button to copy the model's path for the next step.
Here is the code snippet to deploy and run the sentiment analysis task with DeepSparse Inference Runtime. Paste the model stub as the model_path.
from deepsparse import Pipeline
sparse_sa_pipeline = Pipeline.create(task="sentiment-analysis", model_path="zoo:nlp/sentiment_analysis/bert-base/pytorch/huggingface/sst2/pruned90-none")
text = "kept wishing I was watching a documentary about the wartime Navajos and what they accomplished instead of all this specious Hollywood"
sparse_output = sparse_sa_pipeline(text)
print(sparse_output)
# labels=['negative'] scores=[0.9995901584625244]
Deploy an NLP Model from SparseZoo With the DeepSparse Server
In addition to the local Pipeline interface, there is also the DeepSparse Server that’s built on top of Fast API, making it possible to generate HTTP endpoints in minutes.
The DeepSparse Server can be configured using a YAML file that defines the type of task and path to the model. Deploy the previous model using the Server. Save this configuration file as sa_server_config.yaml.
# sa_server_config.yaml
loggers:
  python:

endpoints:
  - task: sentiment-analysis
    model: zoo:nlp/sentiment_analysis/bert-base/pytorch/huggingface/sst2/pruned90-none
Start the Server using the configuration file. Run deepsparse.server --help for usage information.
deepsparse.server --config-file sa_server_config.yamlAfter you run this command, a server instance will initiate and it will start listening on port 5543. To verify that your server is up and running, and to view the details about your server's configuration and capabilities, visit http://YOUR_INSTANCE_IP:5543/docs to check the model server’s documentation. Make server requests using the /predict endpoint that’s part of the documentation.
import requests

# fill in your IP address
ip_address = "YOUR_INSTANCE_PUBLIC_IP"
endpoint_url = f"http://{ip_address}:5543/predict"

# question answering request
obj = {"sequences": "kept wishing I was watching a documentary about the wartime Navajos and what they accomplished instead of all this specious Hollywood"}

# send HTTP request
response = requests.post(endpoint_url, json=obj)
print(response.text)
# >> {"labels":["negative"],"scores":[0.885434627532959]}
Benchmark an NLP Model With DeepSparse Inference Runtime
DeepSparse ships with a benchmarking script for assessing the performance of NLP models.
Here’s how to check the throughput of the sentiment analysis model.
On a n2d-highcpu-8 machine on Google Cloud, DeepSparse achieves 45 sequences per second at batch 64.
deepsparse.benchmark zoo:nlp/sentiment_analysis/bert-base/pytorch/huggingface/sst2/pruned90-none --input_shapes [64,128] --batch_size 64 --scenario sync
# Batch Size: 64
# Scenario: sync
# Throughput (items/sec): 45.1895
# Latency Mean (ms/batch): 1416.2482
# Latency Median (ms/batch): 1417.3845
# Latency Std (ms/batch): 18.0128
# Iterations: 8
Deploy Other NLP Models on Google Cloud Using DeepSparse Inference Runtime
DeepSparse allows you to deploy other NLP models, such as:
- Masked language modeling
- Token classification
- Document classification
The following example shows how to deploy a named-entity recognition model with DeepSparse Pipelines.
from deepsparse import Pipeline
sparse_ner_pipeline = Pipeline.create(
        task="ner",
        model_path="zoo:nlp/token_classification/bert-base/pytorch/huggingface/conll2003/12layer_pruned80_quant-none-vnni",
    )
text = "We are flying from Texas to California"
sparse_output = sparse_ner_pipeline(text)
print(sparse_output)
# predictions=[[TokenClassificationResult(entity='LABEL_0', score=0.9998701810836792, word='we', start=0, end=2, index=1, is_grouped=False), TokenClassificationResult(entity='LABEL_0', score=0.9998960494995117, word='are', start=3, end=6, index=2, is_grouped=False), ….., word='california', start=28, end=38, index=7, is_grouped=False)]]
The same model can be deployed using the DeepSparse Server through a YAML configuration file:
# ner_server_config.yaml
loggers:
  python:

endpoints:
  - task: ner
    model: zoo:nlp/token_classification/bert-base/pytorch/huggingface/conll2003/12layer_pruned80_quant-none-vnni
Start the DeepSparse Server:
deepsparse.server --config-file ner_server_config.yamlRun inference:
import requests

# fill in your IP address
ip_address = "YOUR_INSTANCE_PUBLIC_IP"
endpoint_url = f"http://{ip_address}:5543/predict"

# question answering request
obj = {"inputs": "We are flying to Nairobi"}

# send HTTP request
response = requests.post(endpoint_url, json=obj)
print(response.text)
#'{"predictions":[[{"entity":"LABEL_0","score":0.9997963905334473,"word":"we","start":0,"end":2,"index"....,"is_grouped":false}]]}'
Deploy a Computer Vision Model From SparseZoo Using DeepSparse Pipeline
In this section, you will deploy computer vision models with DeepSparse. You can provide a custom model or use optimized models from SparseZoo, to guarantee fast inference and high throughput.
Follow these steps to deploy a YOLOv5 object detection model with DeepSparse:
- Grab some test images
- Create a DeepSparse Pipeline
- Run inference on the test images
- Annotate using the downloaded script
curl https://raw.githubusercontent.com/neuralmagic/deepsparse/main/src/deepsparse/yolo/sample_images/basilica.jpg > basilica.jpgfrom deepsparse import Pipeline
sparse_pipeline = Pipeline.create(
task="yolo",
model_path="zoo:cv/detection/yolov5-l/pytorch/ultralytics/coco/pruned_quant-aggressive_95",
class_names='coco', # If using custom model, pass in a list of classes the model will classify or a path to a json file containing them
model_config=None, # if using custom model, pass in the path to a local model config file here
)
images = ["basilica.jpg"]
sparse_output = sparse_pipeline(images=images, confidence_threshold=0.2, nms_threshold=0.5)
print(sparse_output)
# YOLOOutput(boxes=[[[264.17516326904297, 484.12618470191956, 519.9077453613281, … 0.7021576762199402,..., 0.49364766478538513, 0.48190781474113464]], labels=[['motorcycle', 'person', 'person', 'car', 'person', 'car', 'person', 'person', 'person', 'person', 'traffic light', 'motorcycle', 'car', 'person', 'person', 'person', 'person']])
Deploy a Computer Vision Model from SparseZoo with the DeepSparse Server
Here’s how to deploy a YOLOv5 model with DeepSparse Server.
Create a configuration file:
# yolo.yaml
endpoints:
    - task: yolo
      model: zoo:cv/detection/yolov5-s/pytorch/ultralytics/coco/pruned_quant-aggressive_94
      kwargs:
        class_names: coco
Start the Server:
deepsparse.server --config-file yolo.yamlCheck the server running at port 5543:
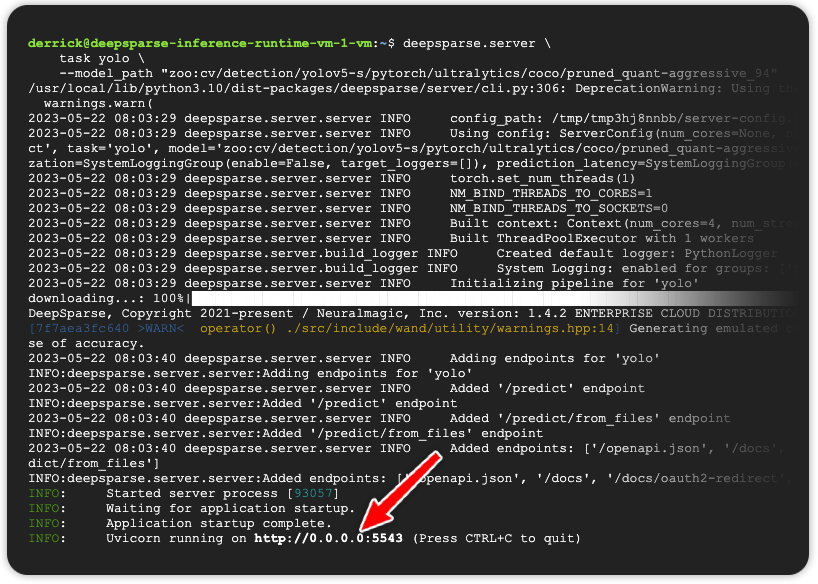
Run inference using YOUR_PUBLIC_IP_ADDRESS/predict/from_files:
import requests
import json

url = 'YOUR_PUBLIC_IP_ADDRESS:5543/predict/from_files'
path = ['basilica.jpg'] # list of images for inference
files = [('request', open(img, 'rb')) for img in path]
resp = requests.post(url=url, files=files)
annotations = json.loads(resp.text) # dictionary of annotation results
bounding_boxes = annotations["boxes"]
labels = annotations["labels"]
print(labels)
# [['car', 'motorcycle', 'person', 'car', 'car', 'person', 'traffic light', 'motorcycle', 'person', 'person', 'person', 'person', 'person', 'person', 'car', 'person', 'car']]
Benchmark a Computer Vision Model with DeepSparse Inference Runtime
On a n2d-highcpu-8 machine on Google Cloud, DeepSparse achieves 22 items per second with batch size 1.
deepsparse.benchmark \
zoo:cv/detection/yolov5-s/pytorch/ultralytics/coco/pruned_quant-aggressive_94 \
    --scenario sync
# Batch Size: 1
# Scenario: sync
# Throughput (items/sec): 21.8506
# Latency Mean (ms/batch): 45.7475
# Latency Median (ms/batch): 45.5678
# Latency Std (ms/batch): 1.1583
# Iterations: 219
Deploy Multiple Models with DeepSparse Inference Runtime
You can deploy multiple models on CPUs without performance degradation, using DeepSparse Runtime. The models will share resources, reducing deployment costs while increasing inference speed and allowing you to fit more optimized models on the same CPU.
Here’s a YAML configuration file for hosting several NLP and CV models on the same Google Cloud virtual machine:
# config.yaml
endpoints:
    - task: question_answering
      route: /question_answering/predict
      model: zoo:nlp/question_answering/bert-base/pytorch/huggingface/squad/pruned95_obs_quant-none
    - task: sentiment_analysis
      route: /sentiment_analysis/predict
      model: zoo:nlp/sentiment_analysis/obert-base/pytorch/huggingface/sst2/pruned90_quant-none
    - task: text_classification
      route: /text_classification/predict
      model: zoo:nlp/text_classification/distilbert-none/pytorch/huggingface/mnli/pruned80_quant-none-vnni
    - task: token_classification
      route: /token_classification/predict
      model: zoo:nlp/token_classification/obert-base/pytorch/huggingface/conll2003/pruned90_quant-none
    - task: text_classification
      route: /document_classification/predict
      model: zoo:nlp/document_classification/obert-base/pytorch/huggingface/imdb/pruned90_quant-none
    - task: image_classification
      route: /image_classification/predict
      model: zoo:cv/classification/resnet_v1-50/pytorch/sparseml/imagenet/pruned85_quant-none-vnni
    - task: yolo
      route: /object_detection/predict
      model: zoo:cv/detection/yolov5-s/pytorch/ultralytics/coco/pruned_quant-aggressive_94
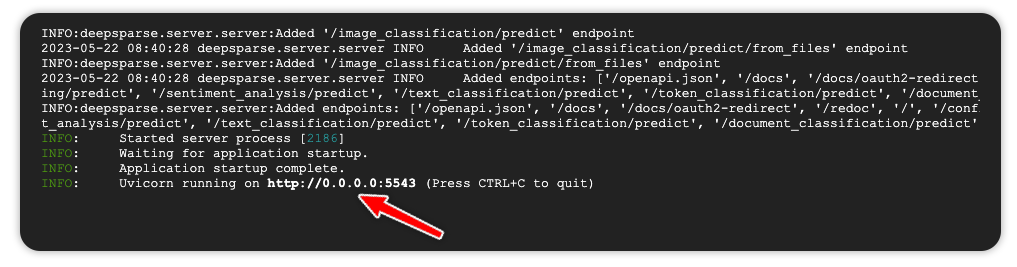
Start the Server using the config file:
deepsparse.server --config_file config.yamlThe endpoints are available on port 5443.
For example, run inference on the YOLO object detection endpoint.
import requests
import json

url = 'YOUR_PUBLIC_IP_ADDRESS:5543/object_detection/predict/from_files'
path = ['basilica.jpg'] # list of images for inference
files = [('request', open(img, 'rb')) for img in path]
resp = requests.post(url=url, files=files)
annotations = json.loads(resp.text) # dictionary of annotation results
bounding_boxes = annotations["boxes"]
labels = annotations["labels"]
print(labels)
# [['2.0', '3.0', …., '0.0', '2.0']]
Prometheus Logging with DeepSparse Inference Runtime
DeepSparse logging enables you to monitor the health of your models in production, so you can keep tabs on production metrics such as latency, query throughout, and model accuracy.
Here’s an example demonstrating how to set up logging with Prometheus.
Follow along by cloning the Prometheus example. The example requires the installation of Docker and Docker Compose.
git clone https://github.com/neuralmagic/deepsparse.git
cd deepsparse
git checkout rs/logging-example
cd examples/logging-prometheus/
The example contains the following files:
client.pyfor interacting with the DeepSparse Server- photo of a goldfish and an image with black pixels
server-config.yamlto configure an image classification pipelinecustom-fn.py for loggingprometheus.yamlconfiguration filedashboard.jsonto configure a Grafana dashboard
Pass the custom function to the server’s configuration file to log the mean pixel of the red channel.
loggers:
  prometheus:     # logs to prometheus on port 6100
    port: 6100

endpoints:
  - task: image_classification
    route: /image_classification/predict
    model: zoo:cv/classification/resnet_v1-50/pytorch/sparseml/imagenet/pruned95_quant-none
    data_logging:
      pipeline_inputs.images[0]: # applies to the first image (of the form stage.property[idx])
        - func: fraction_zeros   # built-in function
          frequency: 1
          target_loggers:
            - prometheus
        - func: custom-fn.py:mean_pixel_red # custom function
          frequency: 1
          target_loggers:
            - prometheus
Start the Server:
deepsparse.server --config_file server-config.yamlNext, configure Prometheus to monitor the DeepSparse image classification server. The provided docker-compose.yaml config starts a containerized Prometheus/Grafana stack.
# docker-compose.yaml

version: "3"

services:
  prometheus:
    image: prom/prometheus
    extra_hosts:
      - "host.docker.internal:host-gateway"     # allow a direct connection from container to the local machine
    ports:
      - "9090:9090" # the default port used by Prometheus
    volumes:
      - ./prometheus.yaml:/etc/prometheus/prometheus.yml # mount Prometheus config file

  grafana:
    image: grafana/grafana:latest
    depends_on:
      - prometheus
    ports:
      - "3000:3000" # the default port used by Grafana
The Prometheus configuration file:
# prometheus.yaml

global:
  scrape_interval: 15s                      # how often to scrape from endpoint
  evaluation_interval: 30s                  # time between each evaluation of Prometheus' alerting rules

scrape_configs:
  - job_name: prometheus_logs               # your project name
    static_configs:
      - targets:
          - 'host.docker.internal:6100'     # should match the port exposed by the PrometheusLogger in the DeepSparse Server config file
Start the Prometheus stack:
cd docker
docker-compose up
Execute client.py to run inference.
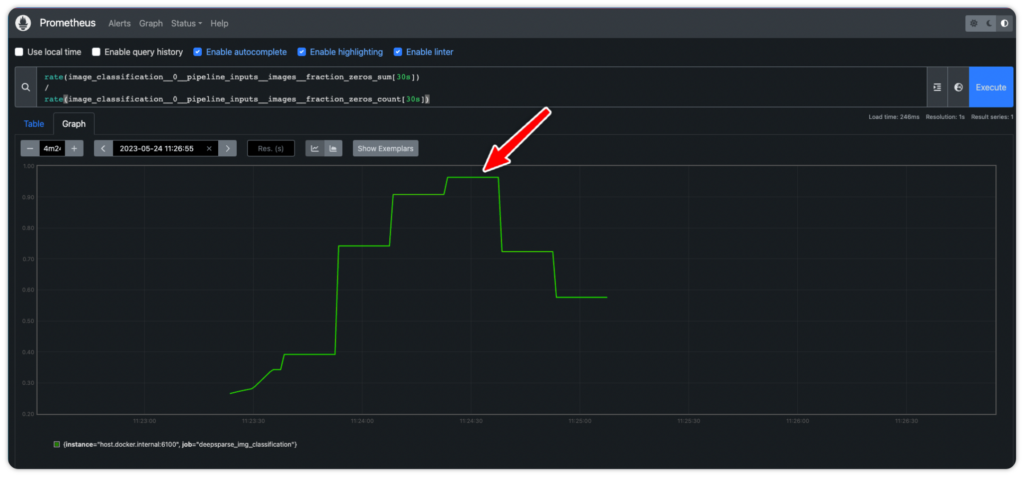
python client/client.pyCheck the Prometheus graph at YOUR_IP_ADDRESS:9090/graph. Add the following expression to check the percentage of 0-pixel images sent to the server.
rate(image_classification__0__pipeline_inputs__images__fraction_zeros_sum[30s])
/
rate(image_classification__0__pipeline_inputs__images__fraction_zeros_count[30s])
Notice the spike in instances where the server receives black images.
Visit YOUR_IP_ADRRSS:3000 to add Prometheus as a Grafana data source. Use admin as the username and password to log in. Check the IP address of Prometheus and use that to add it as a data source in Grafana.
docker inspect -f '{{range.NetworkSettings.Networks}}{{.IPAddress}}{{end}}' YOUR_CONTAINERS_NAME
# 172.18.0.2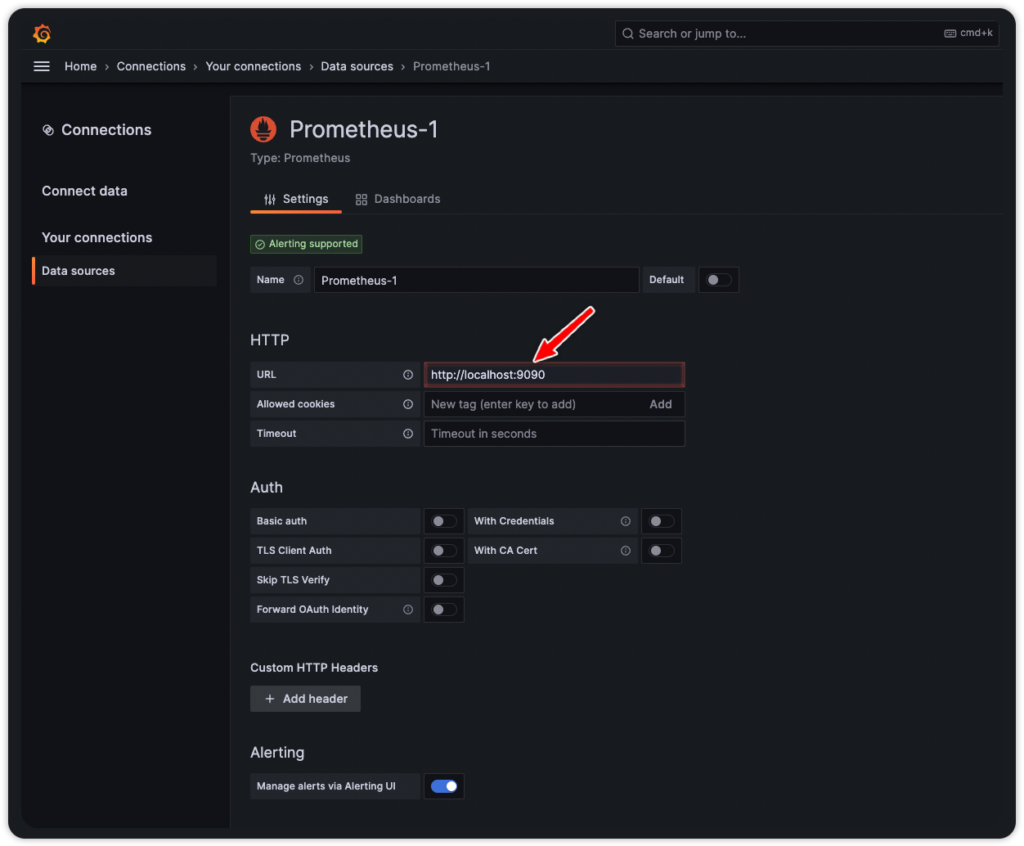
Final Thoughts
Inference costs, latency, and accuracy are the most important factors when deploying NLP and CV models. With the availability of DeepSparse on Google Cloud Marketplace, you can now deploy these models with GPU-class performance on commodity CPUs.
Give it a try and contact us on Slack or via GitHub if you encounter any challenges. We can’t wait to see what you deploy.