
May 18, 2023

Author(s)

This blog, originally posted in December 2022, has been edited in May 2023 to reflect updates made to the "Batch Deployment Flow" section and GitHub repo links.
Leveraging the advantages of serverless computing, developers can deploy and manage AI-driven applications with unprecedented efficiency, scalability, and cost-effectiveness. With serverless deployments, machine learning inference can execute two different ways: 1) real-time inference, where users require immediate responses from their models, and 2) batch inference, where the focus shifts to handling large-scale data, without the need for instant results. To make these deployments faster and cheaper, machine learning developers can use sparse models and DeepSparse as a part of their deployment strategy.
In this blog, we will demonstrate the deployment of a DeepSparse sentiment analysis pipeline on AWS for both real-time and batch inference scenarios, using a CloudFormation stack as the foundation.
For these two deployments you will:
- Build local Docker images with DeepSparse from a Dockerfile
- Create an Amazon Elastic Container Registry (ECR) repository to host the images
- Push the images to the ECR repository
- Deploy a:
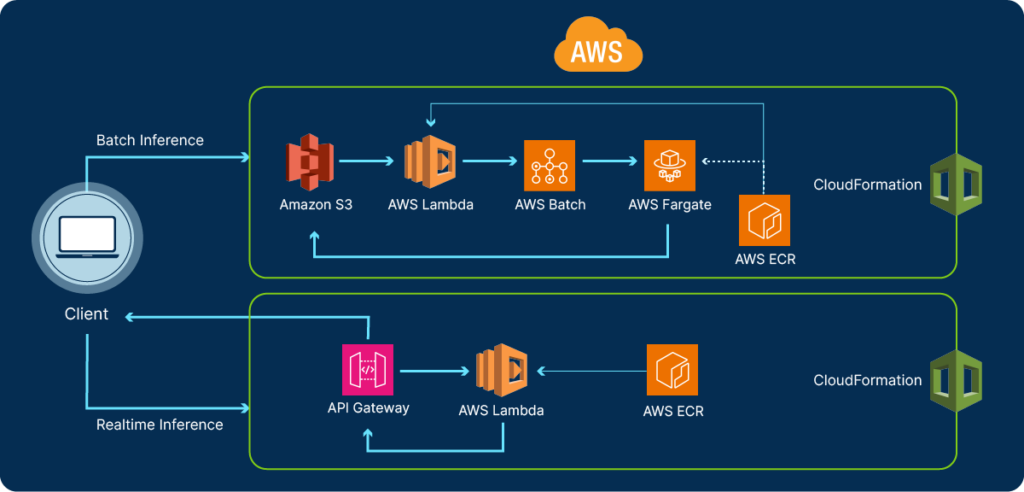
- Realtime Inference Infrastructure which creates a Lambda function via API Gateway in a CloudFormation stack. And...
- Batch Inference Infrastructure which creates a serverless environment on AWS Fargate via an AWS Batch job triggered by Lambda in a Cloudformation stack.
We will use code from the AWS-Serverless example directory found in the DeepSparse GitHub repository. Like our Sagemaker blog, we wrapped our workflow in a Python class to automate the deployment process which is executed in CLI:

To get started, your local machine needs to have the following installed:
- AWS Command Line Interface (CLI) version 2.x configured with: access key ID, secret access key, AWS region, and output format
- The Docker CLI available as part of the Docker installation.
- The AWS Serverless Application Model (AWS SAM), an open-source CLI framework used for building serverless applications on AWS
- Select AWS permissions: AmazonEC2ContainerRegistryFullAccess, AmazonAPIGatewayPushtoCloudWatchLogs, AmazonAPIGatewayAdministrator, AWSLambdaExecute, AWSLambdaBasicExecutionRole, AWSLambdaRole, AWSCloudFormationFullAccess, AWSLambda_FullAccess
Realtime Deployment Flow
For our realtime deployment example, we’ll use a sparse-quantized oBERT model fine-tuned on the SST-2 dataset for the sentiment analysis task (positive or negative). We’ll build a Lambda function with an HTTP endpoint using the AWS SAM CLI library. SAM executes our entire workflow by executing the appropriate IAM permissions, pushing the Docker image to ECR, and connecting your Lambda function to a secure HTTP endpoint on API Gateway. The deployment is managed by the AWS Cloudformation service available on AWS.
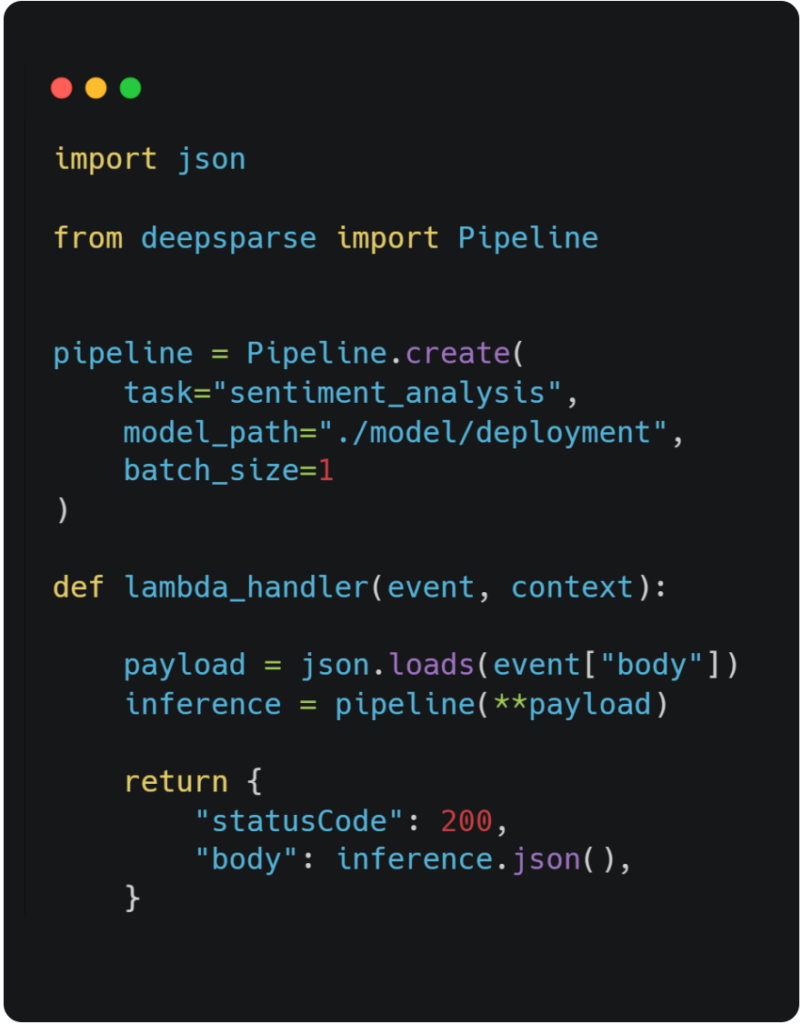
The overall flow to deployment involves generating a Docker image and passing select files from the /app directory into the image, which includes the Lambda handler function found in the app.py file:
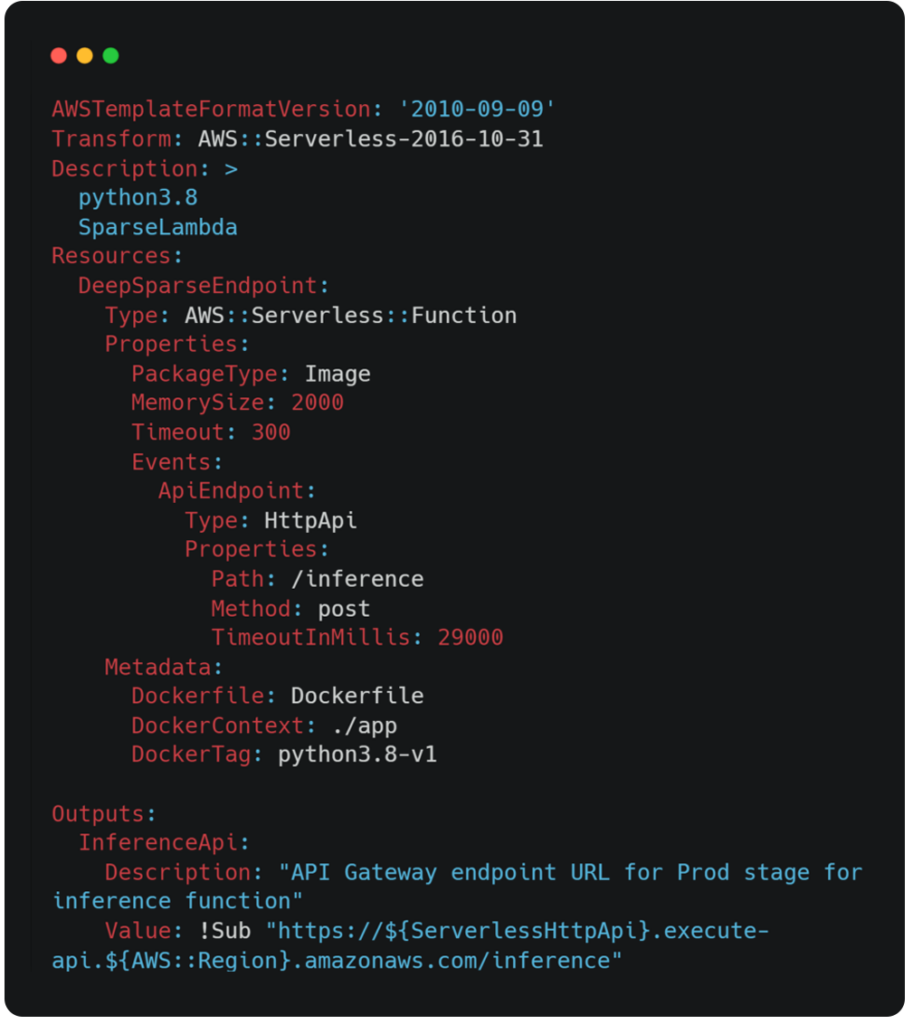
The configuration for the Lambda function is derived from the template.yaml file. This file instructs AWS SAM how to construct your function and has the ability to modify various parameters such as: timeout time, routes, docker management, memory allocation, and auto-scaling policies, etc. To explore additional policies to add to this file, you can view the template get started page on AWS.
Deploy Endpoint and Start Inferencing
To get an endpoint up and running in Lambda you need to clone the DeepSparse repository, change into the aws-serverless example directory, and install boto3 and the click library via the requirements.txt file.
Unset

git clone https://github.com/neuralmagic/deepsparse.git
cd deepsparse/examples/aws-serverless
pip install -r requirements.txt
After you clone the DeepSparse repo, run the following command in the terminal to initialize the SparseLambda object and create your endpoint. The following command will build a Docker image locally, create an ECR repo on AWS, push the image to ECR, and then build the HTTP endpoint via AWS SAM CLI:
Unset

python endpoint.py create-realtime
After the endpoint has been staged (takes ~5 minutes), paste your API Gateway URL (can be found in your terminal output after creating the endpoint) in the LambdaClient object. Now you can run an inference with the following snippet on your local machine:
Unset

from client import LambdaClient
LC = LambdaClient("https://#########.execute-api.us-east-1.amazonaws.com/inference")
answer = LC.client({"sequences": "i like pizza"})
print(answer)

answer: {'labels': ['positive'], 'scores': [0.9990884065628052]}
For your first cold start, it will take ~60 seconds to get your first inference, but afterwards, it should only take milliseconds.
If you want to delete your Lambda infrastructure, run:
Unset

python endpoint.py destroy
Optimization: Avoiding Cold Starts
It can take about 60 seconds to execute a cold function, however to save time, you can set up provisioned concurrency to allow your function to stay persistently warm. To set up provisioned concurrency, you need to create a new version of our function.
Pass the Lambda function name into the following CLI command:
Unset

aws lambda publish-version --function-name <function name>
Tip: To find your function name, look at the print out after creating your endpoint which will display a list of all your Lambda functions running in your AWS account. Look for a function starting with the name lambda-stack-deepsparse-..., this is the function you just generated.
After the new function version is published, pass the function name and the version number (which was printed out in a JSON object after executing the previous command) to the provisioned concurrency config command:
Unset

aws lambda put-provisioned-concurrency-config --function-name <function name> --qualifier
<version number> --provisioned-concurrent-executions 2
After a few minutes, two provisioned concurrent executions will be staged although you can modify this argument to the number that best suits your deployment. Note, provisioned concurrency is an extra cost on AWS.
The last step is to create a new API Gateway trigger inside the new function version we just created. Follow along with this video to see how it’s done on the AWS console:
At the end of the video, a new API URL endpoint for provisioned concurrency is generated. You can pass this new URL into the LambdaClient object as we showed above. You will notice that inference is instantaneous, and our cold start problem has been solved.
Batch Deployment Flow
For our batch deployment, we’ll use the same sparse-quantized oBERT model for the sentiment analysis task used in the previous deployment. The flow begins when the user uploads a CSV file (containing sequences of text for model prediction) to S3. When you upload the file, S3 automatically triggers Lambda to execute a batch job using AWS Batch on a Fargate instance containing a Docker container running DeepSparse and the oBERT model. The sequences from the CSV file are passed from the S3 bucket into the Lambda function and passed one more time into the Fargate instance to be loaded into the model. After the oBERT model has completed its batch inference job, a CSV file is written with the model’s predictions and pushed back to S3.
Similar to the real-time deployment infrastructure, the configuration of the CloudFormation stack is outlined in the template.yaml file in the batch directory. To edit the hardware configuration of the Fargate container, change the default values found at the top of the yaml file. By default, Fargate is currently configured to deploy with 4 vCPUs and 8GB of RAM.
To get started, clone the DeepSparse library, change into the aws-serverless example directory, and install boto3 and the click library via the requirements.txt file just like the real-time inference deployment:
Unset

git clone https://github.com/neuralmagic/deepsparse.git
cd deepsparse/examples/aws-serverless
pip install -r requirements.txt
Run the following command to set up your infrastructure:
Unset

python endpoint.py create-batch
After the infrastructure completes staging, upload the CSV file to the newly created batch-input-deepsparse bucket on S3. The upload can be executed either via the console or through the following AWS CLI command:
Unset

aws s3 cp <path/to/csv/file> s3://batch-input-deepsparse/
Upon upload, the batch job will be triggered. To view the status of the batch job such as job priority and stage of completion, refer to the AWS Batch console. Finally, after the batch job has finished, a new CSV file will be pushed to the batch-output-deepsparse bucket on S3 with the model’s predictions.
To destroy the batch infrastructure but keep the S3 buckets, use the following command:
Unset

python endpoint.py destroy
To destroy the infrastructure and its S3 buckets/content, run this command:
Unset

python endpoint.py destroy-all
Conclusion
So, we introduced a seamless application to auto-deploy a sparse transformer model for sentiment analysis for real-time and batch inference on AWS. This approach automates the creation of select Docker images for Lambda and/or Fargate, an ECR repo and two serverless deployments, depending on your business needs. For more on Neural Magic’s open-source codebase, view the GitHub repositories, DeepSparse and SparseML. For Neural Magic Support, sign up or log in to get help with your questions in the Neural Magic community Slack. Bugs, feature requests, or additional questions can also be posted to our GitHub Issue Queue.